Poly mailers are measured flat, but your product has three dimensions. That gap between how mailers are sized and how products actually pack is where most sizing mistakes happen. This guide gives you the exact formula, a worked example for every common product type, a full size reference table, and a list of the seven mistakes that cause wrong-size orders.
The Poly Mailer Sizing Formula
This is the core formula used to convert your product’s actual dimensions into the minimum mailer size you need:
Minimum mailer WIDTH = product width + (thickness x 2) + 1 inch
Minimum mailer LENGTH = product length + thickness + 2 inches
The extra inches account for the seal flap, seam allowance, and enough room to close the mailer without stressing the adhesive. Once you have your minimums, match them to the nearest standard size that meets or exceeds both numbers.
Always round up to the next standard size, never down. A mailer that is 0.5″ too small will not seal reliably.
Why Measuring Your Poly Mailer Correctly Matters
Product protection — a snug fit prevents the item shifting and bending inside the mailer during transit
Shipping costs — oversized mailers can trigger dimensional weight charges on USPS, UPS, and FedEx routes
Seal integrity — an overstuffed mailer puts pressure on the adhesive strip and can fail mid-transit
Professional presentation — a well-fitted mailer looks intentional; an oversized one looks careless
Custom branding accuracy — designs can be cropped by the seal fold if the clearance zone is not respected
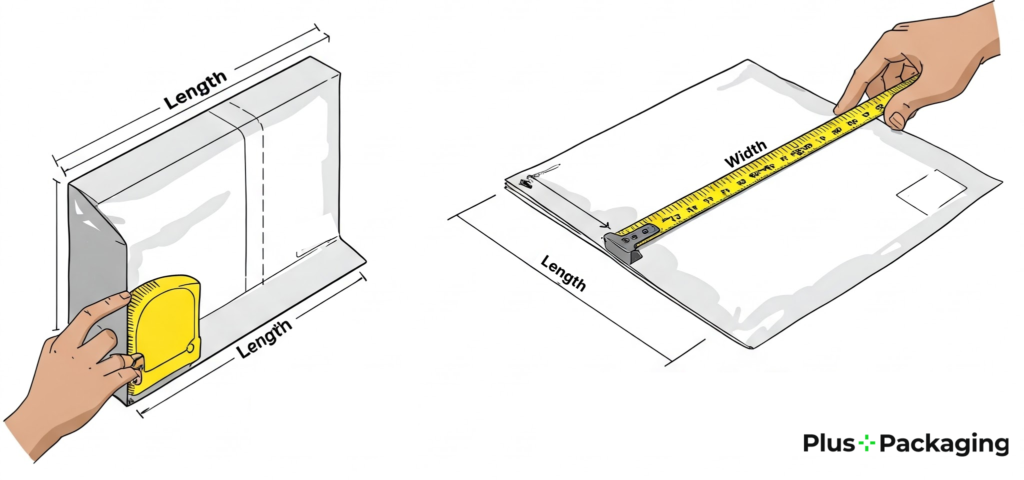
Step-by-Step: How to Measure a Poly Mailer
Step 1 — Measure the mailer itself (if you already have stock)
Lay the mailer flat on a table. Do not stretch the material — measure in its natural, relaxed state.
- Width: measure straight across from left edge to right edge, excluding the side seams
- Length: measure from the bottom seam up to the crease line where the adhesive flap begins — do not include the flap
Poly mailer dimensions on packaging are almost always exterior measurements. Usable interior width is roughly 0.5″ less per side. Factor this in when checking fit.
Step 2 — Measure your product
Fold or arrange the item exactly as it will be when packed. Measure in this packed state, not unfolded.
- Width (W): the shorter side of the folded item
- Length (L): the longer side of the folded item
- Thickness (H): how thick the item is once folded — measure the full stack height with a ruler
For multiple items being packed together, stack them as they will ship and measure the combined width, length, and thickness.
Step 3 — Apply the formula
Plug your product’s three measurements into the formula:
Min. mailer width = W + (H x 2) + 1″
Min. mailer length = L + H + 2″
Example — a medium hoodie folded to 11″ wide x 13″ long x 2″ thick:
Min. width = 11 + (2 x 2) + 1 = 16 inches
Min. length = 13 + 2 + 2 = 17 inches
The nearest standard size that meets both 16″ and 17″ is the 14.5″ x 19″. Correct answer.
Step 4 — Match to the nearest standard size
Take your calculated minimums and find the first standard size that meets or exceeds both the width and length. Use the size chart below. If your minimums fall between two sizes, always move up, not down.
Step 5 — Account for padding (if used)
If you pack the item with bubble wrap, tissue paper, or any other internal material, measure the item plus padding together before applying the formula. Padding adds thickness — typically 0.25″ to 0.5″ per layer of bubble wrap.
Poly Mailer Size Reference Chart
All dimensions are exterior width x length. Usable interior space is approximately 0.5″ smaller per side. The thickness column shows the maximum item thickness this size can comfortably accommodate while still sealing securely.
| Size | Usable Space* | Best For | Thickness Formula |
| 6″ x 9″ | 5.5″ x 7″ | Jewelry, accessories, small cosmetics, phone cases | Flat items only |
| 7.5″ x 10.5″ | 7″ x 8.5″ | T-shirts (S/M), scarves, socks, small books | Up to 1″ thick |
| 9″ x 12″ | 8.5″ x 10″ | Single shirts, shorts, blouses, documents, A4 flat packs | Up to 1.5″ thick |
| 10″ x 13″ | 9.5″ x 11″ | Adult T-shirts/jeans, up to 5 folded tees, light jackets | Up to 2″ thick |
| 12″ x 15.5″ | 11.5″ x 13.5″ | Sweaters, dresses, pairs of jeans, S/M/L hoodies, iPads | Up to 2.5″ thick |
| 14″ x 17″ | 13.5″ x 15″ | Larger clothing, gaming controllers, multiple lighter items | Up to 3″ thick |
| 14.5″ x 19″ | 14″ x 17″ | XL/XXL hoodies, coats, bedding, large soft goods | Up to 3.5″ thick |
| 19″ x 24″ | 18.5″ x 22″ | Bulky coats, shoes (boxed), bed sets, large multi-item orders | Up to 4″ thick |
Approximate usable interior space after accounting for material thickness and side seams. Actual usable space varies by brand and material gauge.
Worked Examples: Common Products
These calculations use the formula above. All product dimensions are after folding in the packed state.
| Product | W | L | H (thick) | Correct Mailer |
| 1x adult T-shirt (folded) | 8″ | 10″ | 0.5″ | 10″ x 13″ |
| 1x M hoodie (folded) | 11″ | 13″ | 2″ | 14.5″ x 19″ |
| 2x hoodies stacked | 12″ | 14″ | 4″ | 19″ x 24″ |
| Pair of jeans (folded) | 10″ | 12″ | 1.5″ | 12″ x 15.5″ |
| A4 document (flat) | 8.5″ | 11″ | 0.1″ | 9″ x 12″ |
| Phone case | 4″ | 7″ | 0.5″ | 6″ x 9″ |
| Dress (M, folded) | 10″ | 13″ | 1″ | 12″ x 15.5″ |
| XL coat (folded) | 14″ | 17″ | 3″ | 19″ x 24″ |
Dimensions above are typical averages. Always measure your specific products — fabric weight, folding technique, and brand sizing all affect the final packed dimensions.
Measuring for Multiple Items in One Mailer
The same formula applies — just measure the combined stack, not individual items.
- Stack all items as they will be packed (folded, flat, in the same orientation)
- Measure the total width, length, and combined thickness of the stack
- Apply the formula using the stack dimensions
- Match to the nearest standard size
Example: Two adult T-shirts stacked = approx. 9″ wide x 11″ long x 1″ thick. Min. width = 9 + (1×2) + 1 = 12″. Min. length = 11 + 1 + 2 = 14″. Correct size: 12″ x 15.5″.
Measuring for Custom Printed Mailers
If you use custom poly mailers with logo, colour, or artwork, the measurement process is identical — but you need to add one additional consideration:
- The seal flap folds over the top 1.5–2 inches of the mailer face when sealed
- Any branding element within that zone will be hidden once the mailer is closed
- Leave at least 2 inches of clearance between the top of your design and the flap crease
- When ordering custom mailers, specify your product’s packed dimensions to your supplier — do not just order based on the item’s unfolded size
Ordering custom poly mailers? The sizing process is the same. Our team can advise on the correct size for your product range before you commit to a print run.
7 Poly Mailer Measuring Mistakes to Avoid
| Mistake | Why It Matters / Fix |
| Including the seal flap in the length | The flap folds over and is not usable space. Measure from the bottom seam to where the flap crease begins. A 14.5″ x 19″ mailer has ~17″ of usable length. |
| Measuring the product unfolded | Always measure in the exact state the item will be packed — folded flat, as compact as possible. |
| Ignoring item thickness | Thickness consumes width AND length. A 2″ thick hoodie in a 12″ wide mailer only has 10″ of usable width after the sides are compressed. Apply the formula. |
| Choosing too tight a fit | A mailer stuffed to capacity puts stress on the adhesive seal. Allow at least 1″ clearance on each side after accounting for thickness. |
| Choosing too large a mailer | Excess space means the item shifts in transit, increasing damage risk. Oversized mailers also trigger dimensional weight charges on some carrier routes. |
| Not accounting for padding materials | If you add bubble wrap or tissue inside, measure the item + padding together, not the item alone. |
| Measuring exterior vs. interior | Most poly mailer dimensions are exterior. Usable interior space is roughly 0.5″ smaller per side. Add that buffer when calculating fit. |
Frequently Asked Questions
Are poly mailer dimensions interior or exterior?
Almost all poly mailer dimensions listed by suppliers — including standard sizes like 10″ x 13″ — are exterior measurements. Usable interior space is approximately 0.5″ smaller on each side due to material thickness and side seams. When calculating fit, subtract roughly 0.5″ per side from the listed dimensions to get the true available interior space.
Does the seal flap count in the length measurement?
No. Poly mailer length is measured from the bottom seam to the crease where the flap begins — the flap itself is excluded. The flap (typically 1.5–2 inches) folds over and is sealed on top of the mailer, so it does not add to usable length. When buying postage or reporting dimensions to a carrier, use the total bag length including the flap.
What if my product is irregular shaped?
Measure the outermost point in each dimension. If the item is cylindrical, measure the diameter as both width and length, and the full height as thickness. For irregular shapes, imagine a rectangle that would fully contain the item and measure that rectangle. When in doubt, size up — the formula’s buffer is designed for regular shapes, not irregular ones.
Can I measure a poly mailer that I already have?
Yes. Lay it flat, smooth it out without stretching, and measure width across the opening edge to edge (excluding the side seams). Measure length from the bottom seam to the flap crease line. These two numbers are the dimensions of that mailer. Check them against the size chart to confirm the size, then apply the formula in reverse to determine what maximum product dimensions it can accommodate.
How much bigger than my product should the mailer be?
The formula already builds in the correct clearance: 1″ extra on width after accounting for thickness, and 2″ extra on length after accounting for thickness. For flat items with no meaningful thickness (documents, cards), add 1–1.5″ to both dimensions as a simpler rule. The goal is a firm fit — not loose, not stuffed.
What if my product is right on the border between two sizes?
Always go up. A mailer that is 0.5″ too small will not seal reliably on a full item. An extra inch of space does not materially affect shipping costs but does eliminate the risk of seal failure and product damage. The cost of a return far outweighs the small cost difference between adjacent mailer sizes.
Do the same measurement rules apply to bubble mailers?
The width and length formula is the same. The key difference is that bubble mailers have a fixed interior cushion layer (typically 3/16″ or 5/16″ bubble) that reduces the usable interior dimensions further. Measure the item, add the formula buffer, and then also subtract the bubble liner thickness from each interior dimension to confirm fit. Bubble mailers are also less flexible than poly mailers, so a tighter formula tolerance is normal.
How do I measure a poly mailer for multiple items?
Stack all items in the orientation they will be packed. Measure the total stack width, length, and combined thickness, then apply the formula to the stack dimensions — not to individual items. See the worked examples table above for multi-item calculations.
Measure Once, Order Right
Getting poly mailer sizing right comes down to three measurements, width, length, and thickness in the packed state, and one formula. Apply the width formula (W + H×2 + 1″) and the length formula (L + H + 2″), match the results to the nearest standard size in the chart above, and you will never order the wrong size again.
The formula accounts for the seal flap, seam allowance, and the clearance needed to close the mailer without stressing the adhesive. The most common mistake is measuring the product unfolded, or ignoring thickness entirely, both result in a mailer that looks right on paper but won’t seal reliably in practice. Measure in the packed state, every time.
Once your size is confirmed, the next step is choosing the right mailer for your product and your brand. Browse our full range of custom poly mailers, available in every standard size from 6″ × 9″ to 19″ × 24″, with branded print options and low minimum orders. If you need end-to-end custom packaging solutions across mailers, boxes, tissue, and tape, our team can help you build a cohesive system. Or explore custom retail bags if you need complementary in-store or gifting packaging alongside your shipping range.